How to Use Multiple Barcodes for the Same Product
Nexchar POS now supports multiple barcodes for a single product, making it easier to manage items that come with different barcode labels from suppliers or manufacturers.
What's New?
Previously, the system supported only one barcode per product. Now, you can add multiple barcodes, separated by commas (,) in the barcode field. This ensures that any of the barcodes will correctly identify the product during scanning or lookup.
When to Use Multiple Barcodes
- The same product has different barcodes from different suppliers.
- You receive stock with varied packaging barcodes.
- You want to associate old and new barcodes with the same product.
How to Add Multiple Barcodes
Option 1: Add from Product Edit Page
- Log in to the Nexchar Back Office.
- Navigate to Menu > Products.
- Click the Edit (✎) icon on the product you want to update.
- In the Barcode field, enter all associated barcodes separated by commas.
- Example:
1234567890123,4567890123456,7890123456789
- Example:
- Click Save.

Option 2: Add via Bulk CSV Import
- Download the product import template from the Products page.
- In the
Barcodecolumn, enter multiple barcodes comma-separated for each product. - Upload the updated CSV file using the Import option.

Printing Multiple Barcodes from Desktop POS
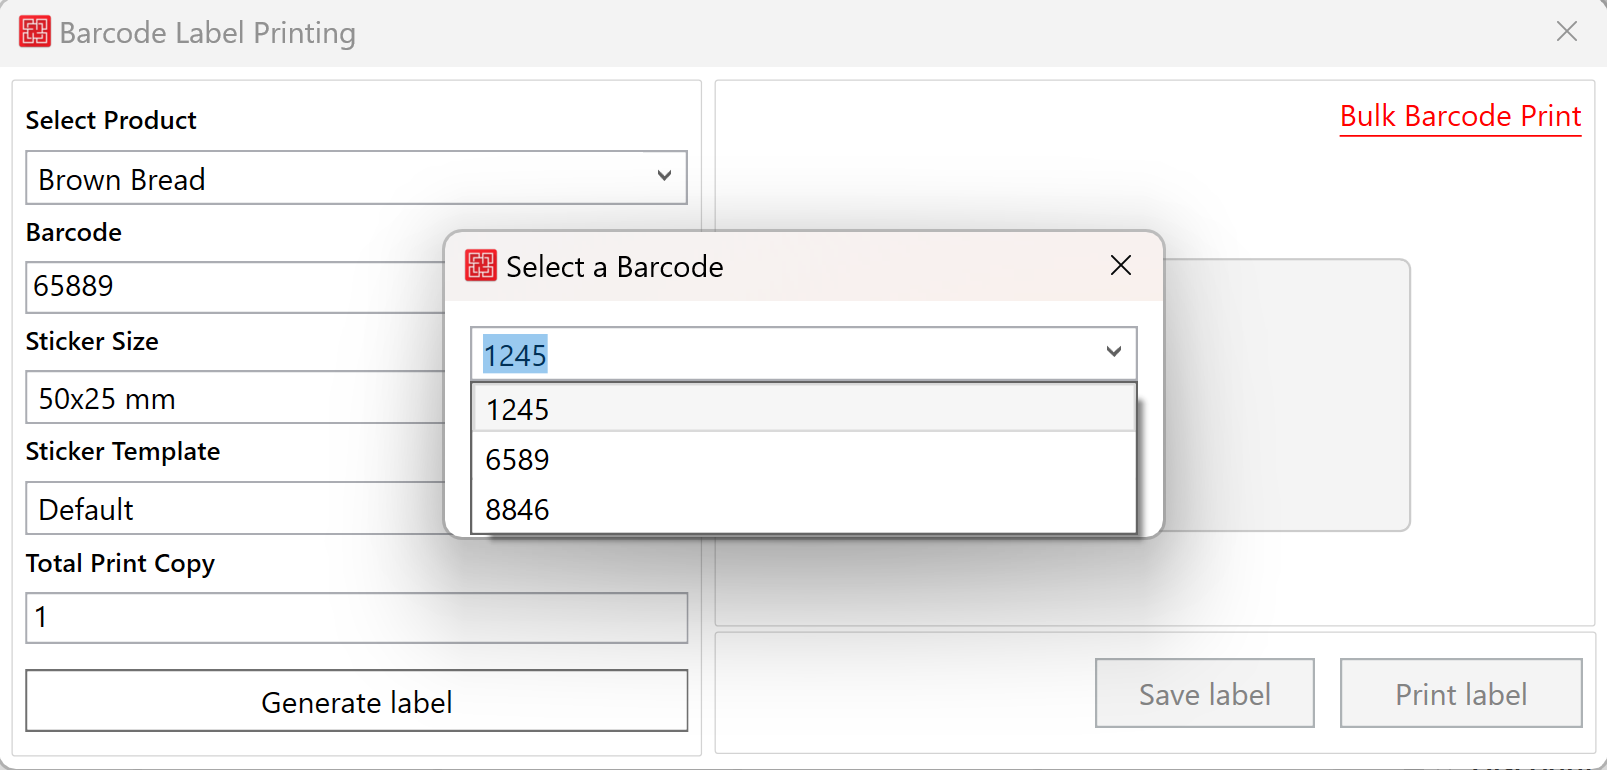
When printing barcode labels from your Desktop POS for products with multiple barcodes, a popup will appear allowing you to select which barcode you want to print.
Example:
As shown below, the system will display all available barcodes for the selected product:
Steps to print:
- Go to Barcode Label Printing.
- Select the product from the dropdown.
- A Select a Barcode popup will appear showing all available barcodes.
- Choose the barcode you want to print.
- Set the sticker size, template, and print quantity.
- Click Generate label, then Print label or Save label.
This gives you full control over which barcode appears on the label—ideal for organizing or labeling based on specific vendor or package.
Notes & Tips
- Do not add spaces between barcodes: ✅
1245,6589❌1245, 6589 - All barcodes must be unique across all products.
- Default barcode will still work for scanning if no specific selection is made during print.